Step-by-step procedure for implementing ZATCA Phase 2 QR printing in Saleculator POS: #
Step 1: Create Private Key Resource #
- Open Saleculator POS
- Navigate to:
Maintenance → Resources - Click New Resource
- Enter:
- Name:
zatca.privateKey - Value: (Leave empty for now, you’ll paste the key in Step 2)
- Name:
- Click Save
Step 2: Get Private Key from Saleculator Partner Portal #
- Go to https://partner.saleculator.com
- Log in using your Reseller ID
- Go to ZATCA Menu → Manage Client
- Search for the client using their Saleculator Activation Key
- Copy the Private Key from the client details
- Go back to Saleculator POS → Maintenance → Resources
- Open the
zatca.privateKeyresource and paste the copied key - Click Save
Step 3: Update Printer Ticket Resource for QR Code #
- Go to Saleculator POS → Maintenance → Resources
- Search for
Printer.Ticket - Edit the resource and add the following QR Code block (ensure it’s properly formatted):
| <barcode type=”QR-ZATCA-PHASE2″ size=”8″> Business Name VAT Number ${ticket.printDateFormatted(“yyyy-MM-dd’T’HH:mm:ss’.000Z'”)} ${ticket.printTotal()} ${ticket.printTax()} </barcode> |
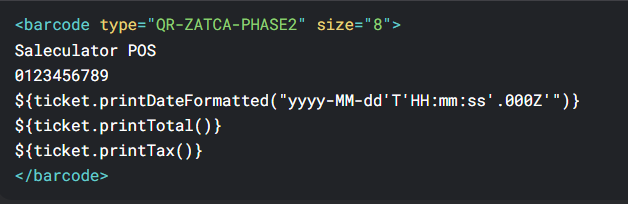
- Replace Saleculator POS with your business name (as registered in ZATCA).
- Replace
1234567890with your VAT Number .
4. Save changes
Step 4: Test the Invoice #
- Create a test invoice and print it.
- Scan the QR code using:
- A QR scanner app (to check content)
- ZATCA’s Fatoora validation tool (for compliance)
- Verify the details match:
- Seller Name (Your Organization)
- VAT Number
- Timestamp (ISO 8601 format)
- Invoice Total (with tax)
- Invoice Hash & Cryptographic Stamps


Leave a Reply