This document will guide you on how to add the payment QR code to the receipts
Procedure: #
Before proceeding, please make sure you are using the latest version of Saleculator => Saleculator v4.1 u1 Also, check if your Receipt Printer does support the QR codes.
Click this link Receipt Printer Self Test to check if your printer is QR code enabled.
1. Log in as Administrator, and go to Menu > Maintenance > Resources
2. Select the resource, Printer.Ticket and copy-paste the below scripts just before the ticket end line that says </ticket>
a. For Printers with QR code support:
<!-- QR Code Start--> <line><text>SCAN & PAY</text></line> <barcode type="QR" size="4">upi://pay?cu=INR&pa=UPI-ID&pn=Name&am=$ticket.printTotal()</barcode> <!-- QR Code End-->
b. For Printers with no QR code support:
<!-- QR Code Start--> <line><text>SCAN & PAY</text></line> <barcode type="QR-IMAGE" size="4">upi://pay?cu=INR&pa=UPI-ID&pn=Name&am=$ticket.printTotal()</barcode> <!-- QR Code End-->
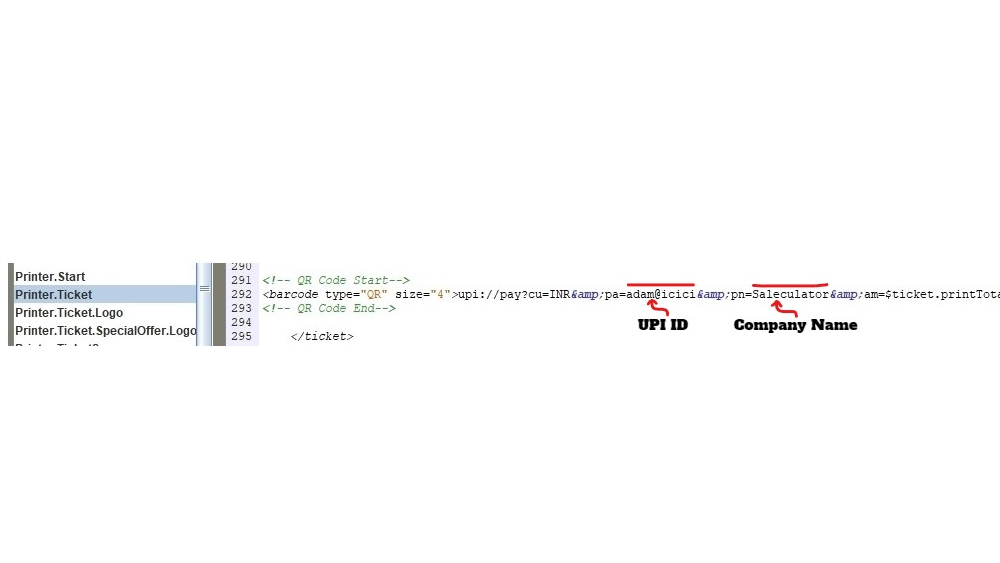
Replace the term “UPI-ID” after “pa=” with your own UPI ID (E.g. john@icici, john@kyl, etc.,) and the term “Name” after “pn=” with your company name. Make sure the script is a single line. Refer to the below image:

3. Once updated click on the Save button and restart the system
4. Now try to take a receipt printout by billing any products. You will get a QR code printed at the bottom of the receipt as shown in the below image.


Leave a Reply